Mindful Movement for Pelvic Pain

Persistent pelvic pain can be an overwhelming experience. Pain, whatever the severity, can consume our thoughts and steal much of our cognitive energy, leaving us feeling exhausted and stressed. Pain can elicit not just physical responses, but mental and emotional responses- one of the most common being fear of movement. Often, we become fearful of experiencing the pain itself and we are concerned we might be “making things worse” by moving through our daily activities. After experiencing pain for a while, the brain can begin to anticipate pain and as a result, a person may come to fear movement itself. Commonly, individuals who suffer persistent pain will start to limit their mobility out of a natural desire to protect and preserve their body but in doing so, they may actually be causing more problems such as excessive muscle tension/guarding, hypersensitization of tissues, decreased flexibility of the muscles and connective tissues, decreased mobility and lubrication in the joints, and decreased muscle strength- all of which can create more aches! A gentle yoga program can help to improve our health and reduce pain by re-establishing comfortable movements and minimizing nervous system responses that increase stress and inflammation.
How Does Yoga Decrease Pelvic Pain?
Yoga is an ancient practice that cultivates awareness through careful observation of the mind, the body, and the present moment. When dealing with pain, it can become easy to disconnected from or even resentful of the part of our body that experiences chronic pain. Sometimes we can feel hopeless, like we don’t understand how to best love and heal the part of us that hurts. The mindful practices of yoga allow us to reconnect with our body, observe it as it is- without judgement, and tune in to work with it, rather than against it, to re-establish a natural state of harmony. Yoga trains us to experience life and movement as it is occurring here and now, shifting the focus away from past painful experiences or expectations of pain. Introducing conscious breathwork and slow movements at the pelvis, hips, ribcage and spine that feel safe, and maybe more importantly, feel good is essential to the process of healing.
Yoga, under the right guidance, can help to:
- decrease anxiety, depression, and fear
- encourage mental and emotional grounding
- enhance body awareness and the mind-body connection
- balance the nervous system to promote rest, relaxation, and restoration
- lengthen and stretch muscles/soft tissues
- support the functional relationship of the diaphragm and pelvic floor
- re-educate muscles and correct muscle imbalances
- improve strength and balance
“You cannot always control what goes on outside. But you can always control what goes on inside.”
Wayne Dyer
8 Gentle Yoga Poses to Reduce Pelvic Pain
Remember, these postures and movements should feel good. Move, stretch, and breath within your own comfort zone at a speed that feels right for you. If these poses or movements hurt, stop and consult a pelvic health physical therapist. If you are pregnant or have hypermobility disorders or mixed connective tissue disorders such as Elhers Danlos consult a physical therapist first before engaging in a yoga practice.
Happy Baby
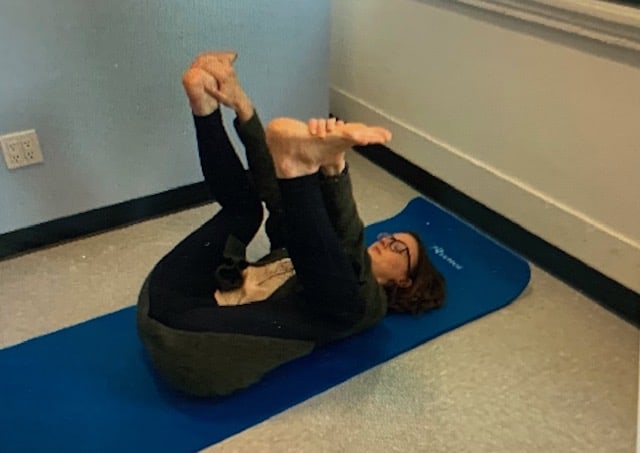
Benefits: Stretches and decreases the activity of the muscles of the pelvic floor and the inside of the thigh.
Instructions:
- Lay on your back and gently bring one leg up at a time to meet your hands. (You can grasp on to your feet, ankles, or shins depending on the flexibility of your hips).
- Keep a straight back and let your pelvis be heavy so as to keep your tailbone close towards the ground.
- Connect to your breath, feeling your ribcage, abdomen, and sit bones gently expand out in all directions as you visualize your tailbone sinking down toward the floor.
Bound Angle (seated, supported reclined, or laying down)
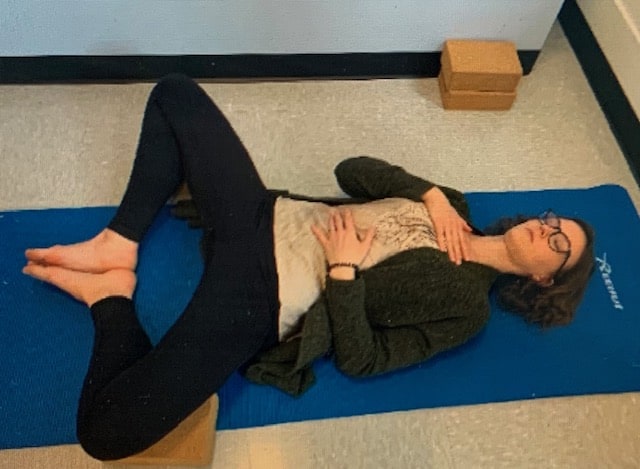
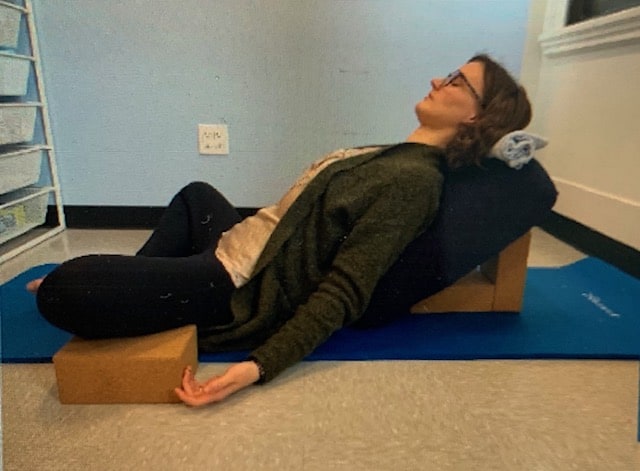
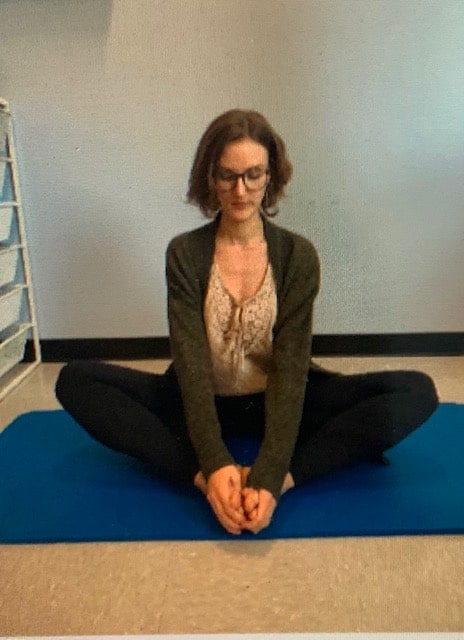
Benefits: Hip opening stretch for the muscles and connective tissues of the inside of the thighs.
Instructions:
- Pick the orientation that feels best for you.
- Bring the heels together and slowly let the knees fall out to the sides.
- You may need the support of pillows or blocks underneath the knees to prevent any hip discomfort or muscle guarding/holding.
- Place one hand on your chest and one on your abdomen and feel them rise and fall with your breath. Mindfully focus on slowing down and deepening your breath to inhale for four seconds and exhale for six seconds.
Supported Savasana
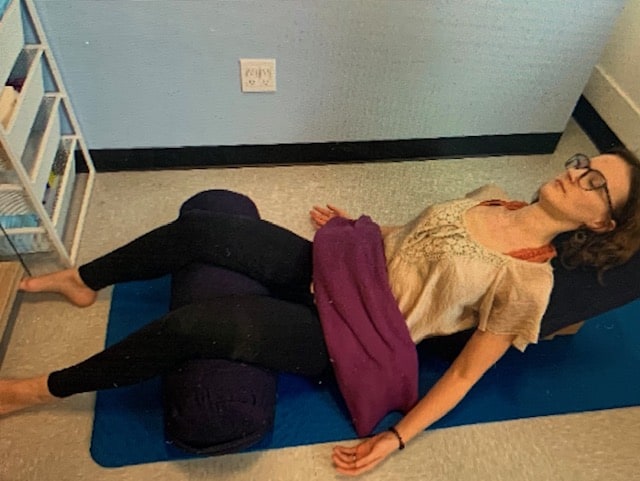
Benefit: Calms the nervous system and relaxes the lumbo-pelvic girdle. This is a great pose for the end of a busy, stressful day. Here you can perform deep breathing exercises, meditation, or relaxation techniques such as progressive muscle relaxation and mindful body scans.
Instructions:
- Place bolster length wise on the mat and elevate one side using block or blanket support underneath, so that you can lay down in a slight reclining position.
- If you have tailbone or sacral pain, lying flat on your back may be a better alternative.
- Legs can lay straight out or you can place bolster/pillow support underneath your knees.
- If it feels good, add some blankets onto your pelvis for some comforting deep pressure to facilitate relaxation.
“Letting go is the hardest asana.”
Anonymous
Supported Child’s Pose
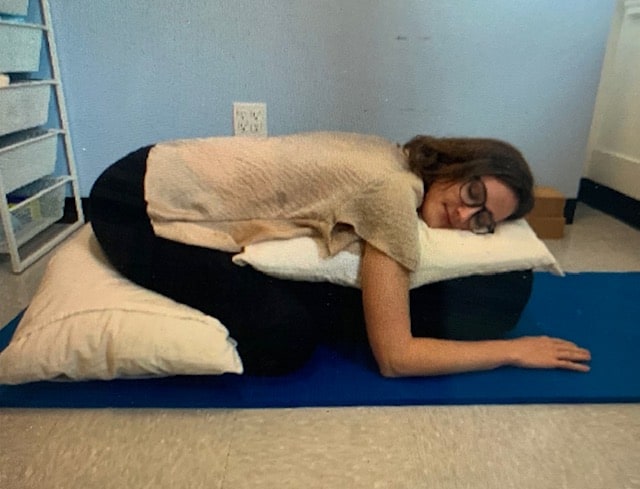
Benefits: Child’s pose is often a very soothing posture that calms the nervous system. Mimicking the fetal position, child’s pose can evoke feelings of safety and peace. This pose also increases flexibility of the lumbopelvic region and allows us to breathe deeply into the back and sides of our ribcage.
Instructions:
- Start in a tall kneeling position and place bolster/pillows in front of you and a pillow on top of your heels.
- Fold at the hips to set your head and chest onto the supportive surface and let your sit bones move toward your heels.
- You should feel fully supported and comfortable. If not, try adding another pillow, blanket, or towel where you need it.
- If your ankles feel tight you can place a rolled towel under the top of your ankles.
Table Top Rock Backs
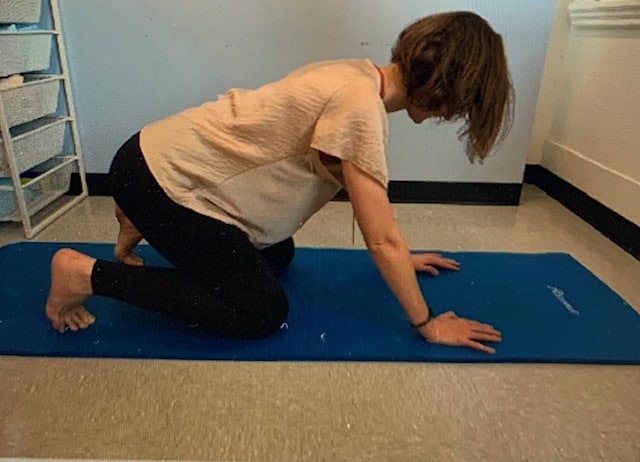
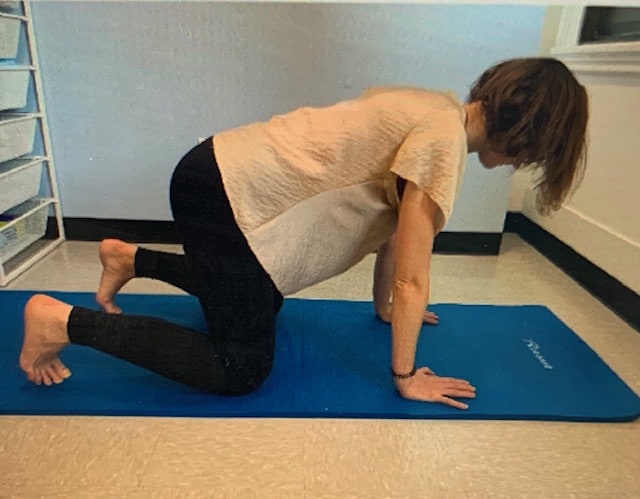
Benefits: For some people, child’s pose might feel too intense as it requires a lot bending at the hips which may irritate people who have pudenal neuralgia or tight hips/pelvis musculature. Rock backs are a good way to ease into a more flexed hip position and isolate controlled mobility of the hip joints.
Instructions:
- Start in table top pose with hands and knees directly under shoulders and hips.
- Inhale, shift pelvis back while maintaining a straight spine, only bending at the hips.
- Exhale and pull your body back to the starting table top position by rooting down firmly through the hands ankeeping your core active.
- Rock back for 10 breaths.
Cat Cow
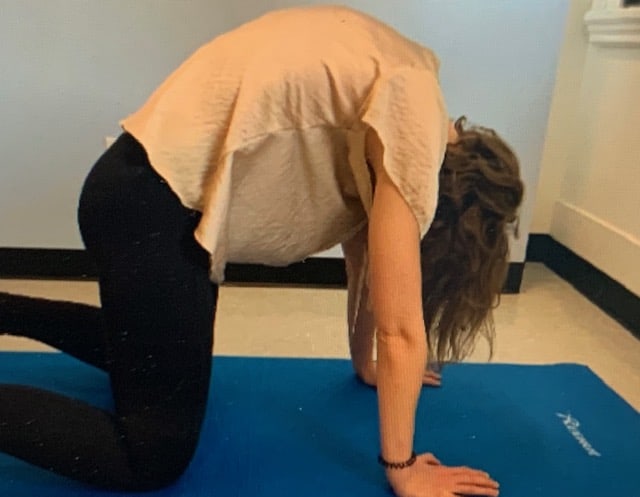
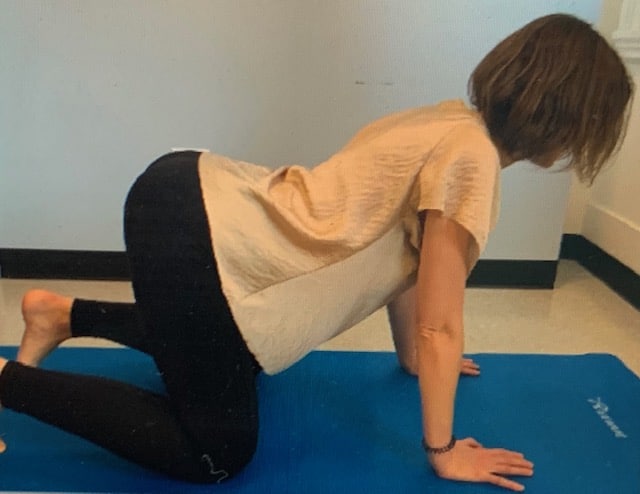
Benefits: Improves spinal mobility and segmental control of our vertebrae. Spinal mobility plays an important role in pelvic health as the pelvic floor attaches to our tailbone-the base of our spine. We also need spinal mobility and control in order to breathe optimally and activate our core efficiently.
Instruction:
- Start in table top with hands and knees directly under shoulders and hips
- On your inhale, send the tailbone and head up toward the ceiling as you let your back arch and your chest and abdomen soften towards the floor
- On your exhale, pull the belly button up toward the spine and let your back round up towards the ceiling as you tuck your head and pelvis down and in.
- Continue these alternating motions for 10 breaths, or however long feels good to you.
- Once you feel comfortable with this movement, you can start moving intuitively here. Find what feels good for you. Bend to the side like you are “wagging your tail.” Do some small or large pelvic circles by swooping the pelvis out and down towards the heels and circling back up to table top position.
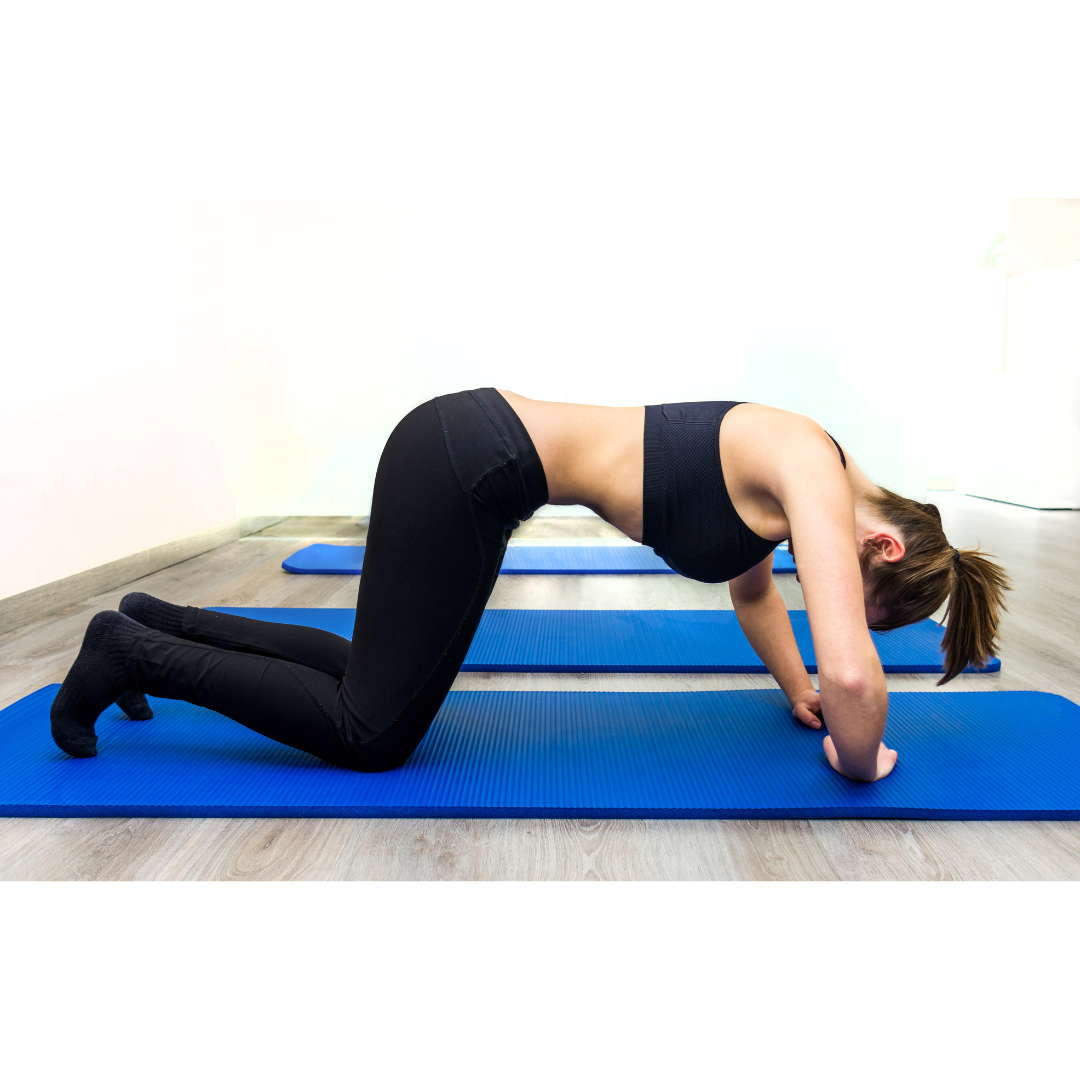
Supported Puppy
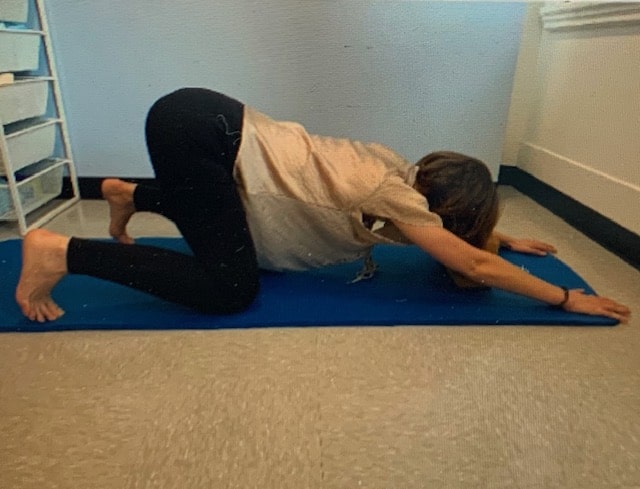
Benefits: This pose helps to lengthen the spine and maximally stretch the pelvic floor muscles.
Instructions:
- Begin in table top with your feet active and toes flexed.
- Start to reach out the hands long in front of you to lengthen the spine.
- Be sure to keep your back long and straight by resting your forehead on a book or block.
- Walk the feet out towards the side of the mat so they are slightly wider apart than your hips.
- Reach out long through the heels and hands as you visualize the sit bones expanding and the tailbone reaching up and out with each inhale
Sphinx
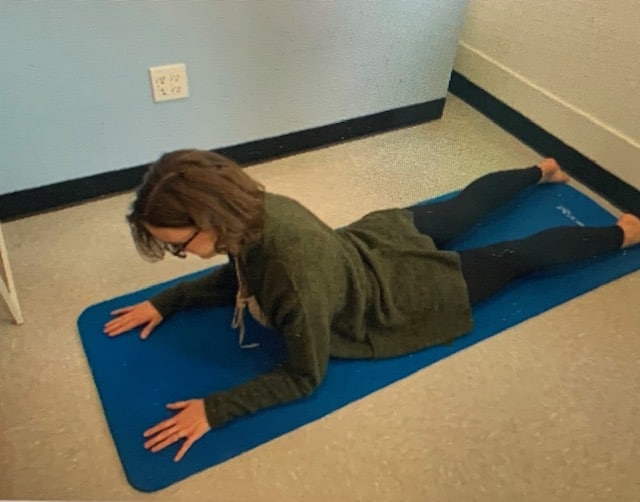
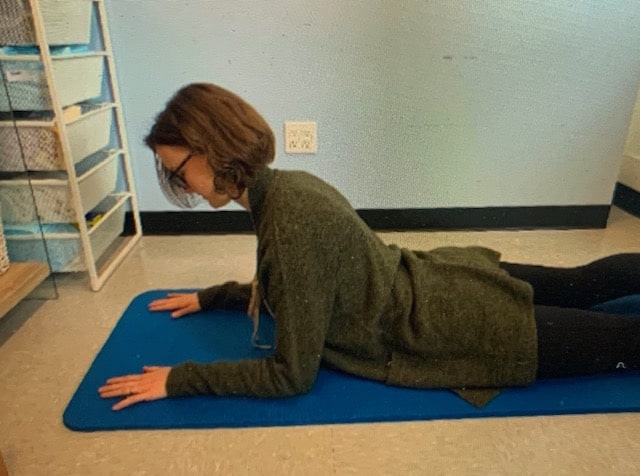
Benefits: Stretches and lengthens abdominal connective tissues and the front of the hips. Sphinx also helps to strengthen the shoulders and increases spinal mobility.
Instructions:
- Start by laying on your belly.
- Press the top of the feet and the pubic bone into the ground as you lift your chest off the ground and place elbows directly underneath the shoulders.
- Keep your forearms, palms, and fingers connected to the ground.
- Be sure to keep your neck straight and long, reaching out through the crown of your head.
- You should not feel pain in your low back. If this stretch feels too intense for your low back or stomach, try placing a pillow under your stomach
- If you feel comfortable here, try breathing deeply into the abdomen and adding in some slow side to side ribcage shifts or small rotations if that feels good.
For more information and videos on yoga for pelvic pain, check out Dustienne Miller, CYT, PT, MS, WCS at Your Pace Yoga.
The Next Step
Keep in mind, there is no one size fits all yoga or exercise program! These yoga postures and movements can provide gentle, pain-free movement alternatives to help you manage your pain, but you still may need to schedule an appointment with a pelvic health PT to create a comprehensive, holistic plan to address your specific needs. Contact Body Harmony Physical Therapy to learn more about movement alternatives, relaxation techniques, and pain management strategies for pelvic pain.
This blog was created for informational purposes only and is not intended be a substitute for professional medical advice, diagnosis, or treatment. Always seek the advice of your physician or other qualified health provider with any questions you may have regarding a health condition or before beginning a new exercise routine.
Written by: Serenity Serafini, PT, DPT


